You have two paths to launch a WooCommerce store. The first gets you live in 6 minutes with staging, auto SSL, and CDN enabled by default. The second costs less upfront but takes 2–4 hours and leaves you managing infrastructure yourself.
This guide walks through both. Most first-time store owners choose the fast managed hosting path. Budget-conscious site builders with technical comfort choose the DIY route on shared hosting. By the end, you'll know which path fits your situation and how to execute either one.
If you need the technical requirements breakdown first — why WooCommerce needs Redis, isolated PHP resources, and staging environments — read our WooCommerce Hosting Guide before continuing here.
Before You Start: Choosing Your Hosting Path
WooCommerce runs on WordPress, which means you need a hosting account that meets these minimum requirements:
- SSL certificate — HTTPS is mandatory for payment processing
- PHP 8.0 or higher — WooCommerce requires modern PHP
- MySQL 5.6 or higher — for the WordPress database
- Adequate server resources — enough memory and CPU to handle checkout traffic
Every hosting provider meets these requirements on paper. The difference is in how much infrastructure work you handle yourself versus how much comes pre-configured.
Here's the decision:
| Factor | Managed Hosting ($30-50/mo) | Shared Hosting DIY ($5-15/mo) |
|---|---|---|
| Setup time | 6 minutes (wizard) | 2-4 hours (manual) |
| SSL certificate | Auto-provisioned, auto-renews | Manual setup in cPanel |
| Staging environment | Included, one-click create | Not included (plugin workaround) |
| CDN | Enabled by default | Plugin required |
| When to add Redis | Add-on when needed (50+ orders/day) | Not available on shared plans |
| Best for | First store, launching fast, no tech hassle | Budget under $30/mo, learning experience |
If your budget allows $30–50/month and you want to focus on products and marketing instead of server configuration, the managed path is the clear choice. If you're budget-constrained and comfortable troubleshooting technical issues, the DIY path works.
For specific host recommendations based on your situation, see our WooCommerce hosting comparison for speed-focused stores.
Try Kinsta — 6-Minute Setup → Try Rocket.net — $1 First Month →
Path A: Fast Setup on Managed WordPress Hosting
Managed WordPress hosts like Kinsta and Rocket.net provide a wizard that takes you from account signup to live WooCommerce site in approximately 6 minutes. The wizard handles WordPress installation, SSL certificate provisioning, CDN activation, and optionally installs WooCommerce with one checkbox.
Here's the workflow using Kinsta as the example — Rocket.net follows a nearly identical structure:
The 6-Minute Wizard Experience
Step 1: Choose site type. The wizard presents three options: WordPress, WordPress with WooCommerce, or Application Hosting. Select "WordPress with WooCommerce" if you want WooCommerce pre-installed. If you prefer to install WooCommerce manually after WordPress is live, choose the plain WordPress option.
Step 2: Configure infrastructure. You'll select a data center location and toggle CDN and Edge Caching on or off. Both are enabled by default. The data center defaults to Chicago for US-based accounts. If your audience is outside the US — India, Europe, Australia — change this now. A Mumbai-hosted site serving Indian customers will load significantly faster than one hosted in Chicago.
Step 3: Set WordPress credentials. Enter your desired WordPress admin username and password, site title, and language. The username field pre-fills as "admin" — change this for better security. If you selected the WooCommerce option in Step 1, you can also enable Yoast SEO and Easy Digital Downloads with checkboxes here.
Step 4: Wait approximately 6 minutes. The wizard provisions the server container, installs WordPress and WooCommerce, generates an SSL certificate via Cloudflare, activates the CDN, and brings the site live. You'll see a progress screen. When complete, you receive a MyKinsta dashboard link and your live site URL.
SSL is already active. CDN is already routing traffic. WooCommerce is already installed if you checked the box. The site is live and ready for products.
What You Get Immediately After the Wizard
Unlike shared hosting where you spend the next hour configuring SSL, installing security plugins, and troubleshooting caching conflicts, managed WordPress hosting delivers a production-ready environment:
- HTTPS everywhere — SSL certificate auto-renews every 90 days
- Global CDN active — 260+ edge locations serving static assets
- Staging environment available — one-click create from the dashboard for testing changes before pushing live
- Automatic daily backups — 14-day retention on entry plans, more on higher tiers
- Server-level caching — no caching plugin required or recommended
You can create a staging copy of your site with one button click, test new products or payment gateway configurations, then push the changes to the live site when ready. On shared hosting, staging requires a plugin that replicates your database and files locally — and that plugin can break during complex updates.
Adding Your First Products on Managed Hosting
Log into WordPress via the MyKinsta dashboard auto-login link. Navigate to Products → Add New. Enter your product name, description, price, and upload product images. Set product categories if you're organizing by collection or product type. Click Publish.
Your first product is live. The CDN is already caching product images globally. Checkout pages are already HTTPS-secured. You didn't configure a single server setting to get here.
When you're ready to accept real payments, you'll configure Stripe or PayPal in test mode first (covered in the Essential Configuration section below), process a test transaction in your staging environment, verify the webhook responds correctly, then flip to live mode and push to production.
This is the managed hosting advantage: infrastructure is invisible. You focus on products, pricing, and marketing. The host handles SSL renewals, security patches, caching layer optimization, and server resource scaling.
Start with Kinsta → Start with Rocket.net →
Managed Hosting Options: Kinsta vs Rocket.net
Both Kinsta and Rocket.net deliver the fast setup experience described above. The differences are in pricing structure and included features:
Kinsta offers two pricing tracks: bandwidth-based or visits-based. You choose at signup and can switch later in the dashboard. Entry plans start at $35/month for single-site hosting (20GB bandwidth or 35,000 visits, depending on your track choice). Redis caching is a $100/month add-on available on all plans when you reach high order volume. Staging is included on every plan. 27 data center locations.
Rocket.net includes Redis free on all plans starting at $30/month (1 site, 250,000 visits). All plans include Cloudflare enterprise-tier CDN for faster global performance. Staging is included. First month costs $1 on all monthly plans. Fewer data center options than Kinsta but still covers major regions.
If you expect high order volume from day one or need Redis early, Rocket.net's included Redis at $30/month beats Kinsta's $100/month add-on. If you need more granular data center selection or prefer bandwidth-based billing, Kinsta offers more flexibility.
For detailed comparison, see Kinsta vs Rocket.net.
Path B: Manual Setup on Shared Hosting
If your budget is under $30/month and you're comfortable with technical troubleshooting, shared hosting remains a viable path. You'll install WordPress manually via cPanel, add the WooCommerce plugin, configure SSL through your hosting control panel, and manage caching with a plugin. Setup time ranges from 2 to 4 hours depending on your familiarity with WordPress and how quickly your DNS propagates.
When the DIY Path Makes Sense
Choose manual setup on shared hosting if:
- Your budget ceiling is $15/month and you cannot allocate more for hosting
- You're building the store as a learning project and want to understand every configuration step
- You're comfortable reading documentation and troubleshooting plugin conflicts
- You don't need staging environments or advanced caching in the first 6 months
The tradeoff is clear: you save $15–35/month but spend 2–4 hours on initial setup and ongoing hours managing updates, security, and performance optimization that managed hosting handles automatically.
High-Level DIY Workflow
The manual path follows this sequence:
- Register domain and purchase shared hosting plan — providers like Hostinger offer shared WordPress hosting starting around $2–4/month on promotional rates
- Install WordPress via cPanel — most shared hosts provide Softaculous or a similar one-click WordPress installer
- Configure SSL certificate — enable free Let's Encrypt SSL in cPanel and force HTTPS in WordPress settings
- Install WooCommerce plugin — from WordPress dashboard, navigate to Plugins → Add New, search for WooCommerce, install and activate
- Run WooCommerce setup wizard — configure store location, currency, payment gateways, shipping options
- Install caching plugin — WP Super Cache or similar to improve page load times
For detailed step-by-step instructions on WordPress installation and initial WooCommerce configuration, WordPress.org maintains comprehensive free documentation. We won't replicate that content here — their guides are thorough and kept current with each WordPress and WooCommerce release.
What you won't have on shared hosting without additional plugins or paid upgrades: staging environments for testing changes before they go live, Redis object caching for high-traffic stores, server-level caching that eliminates plugin overhead, isolated PHP resources that prevent neighbor sites from affecting your performance.
These limitations don't prevent you from launching a store. They become friction points when you scale past 50 orders per day or 10,000 visits per month. At that threshold, most store owners migrate to managed hosting to eliminate the performance ceiling.
Essential Configuration After Install (Both Paths)
Whether you used the 6-minute managed wizard or spent 2–4 hours on manual setup, you now have WordPress and WooCommerce installed. These configuration steps apply to both paths.
Payment Gateway Setup: Start with Test Mode
Never configure a payment gateway directly in live mode. Stripe, PayPal, and other processors provide test environments that let you verify checkout workflows without processing real transactions. This matters because payment webhooks — the behind-the-scenes communication between WooCommerce and the payment processor — can fail silently if configured incorrectly. A failed webhook means a customer pays but WooCommerce never marks the order as paid, creating operational chaos.
Stripe test mode: Navigate to WooCommerce → Settings → Payments → Stripe. Enable test mode, enter your Stripe test API keys (available in your Stripe dashboard), save changes. Process a test transaction using Stripe's test card number 4242 4242 4242 4242. Verify the order appears in WooCommerce with "Processing" status and that the Stripe webhook fires correctly (check WooCommerce → Status → Logs).
PayPal sandbox: Similar workflow using PayPal's sandbox environment. Create a sandbox business account and sandbox buyer account in your PayPal developer dashboard, enter sandbox credentials in WooCommerce, process a test transaction, verify webhook response.
Only after test transactions complete successfully and webhooks respond within the 10-second timeout window should you switch to live mode and enter production API keys.
For Indian stores: Razorpay and PayU are the dominant payment gateways for Indian customers, supporting UPI, net banking, wallets, and cards with local acquiring. Configuration follows the same test-mode-first workflow. For detailed setup instructions and gateway comparison, see our guide Best WooCommerce Hosting for Indian Stores.
Shipping Zones and Methods
WooCommerce requires at least one shipping zone before customers can complete checkout. Navigate to WooCommerce → Settings → Shipping. Click "Add shipping zone," name it (e.g., "United States" or "Domestic"), select regions this zone covers, then add shipping methods — flat rate, free shipping, or local pickup.
If you ship internationally, create additional zones for other countries or continents with their own shipping methods and rates. Each zone can have multiple methods. Customers see applicable methods at checkout based on their shipping address.
Tax Settings and Permalink Structure
Configure tax rates in WooCommerce → Settings → Tax. Enable or disable tax calculation based on your jurisdiction, add tax rates for regions where you have nexus, choose whether prices display inclusive or exclusive of tax.
Set permalinks to a URL structure that includes product names: Settings → Permalinks → Post name. This creates clean URLs like yoursite.com/product/blue-t-shirt instead of yoursite.com/?p=123. Search engines and customers both prefer readable URLs. Change this before adding products — changing permalink structure after products are indexed causes broken links unless you configure redirects.
Adding Your First Products
Navigate to Products → Add New. The product editor resembles the WordPress post editor with additional WooCommerce-specific fields.
Simple Products vs Variable Products
WooCommerce distinguishes between simple products (one SKU, no variations) and variable products (multiple SKUs with different attributes like size or color).
Simple product: A book, a fixed-size poster, a digital download. One price, one inventory count, one product. Enter the product name in the title field, add description in the main editor, set the price in the Product Data → General tab, upload a product image to the Featured Image area. Publish.
Variable product: A t-shirt available in small, medium, and large. A mug available in white or black. Each variation can have its own price, SKU, stock level, and image.
Creating Variable Products with Attributes
To sell a t-shirt in three sizes, you first define "Size" as an attribute, then create three variations — one for each size value.
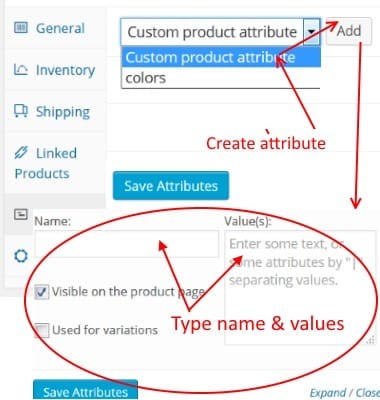
In the Product Data section, select "Variable product" from the dropdown. Navigate to the Attributes tab. Click "Add" and choose "Custom product attribute." Name it "Size," enter values separated by a pipe character: Small | Medium | Large. Check "Used for variations" and save the attribute.
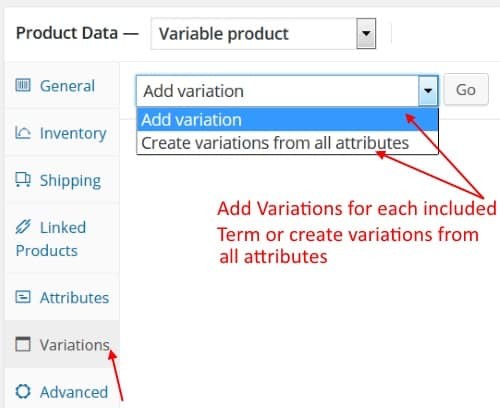
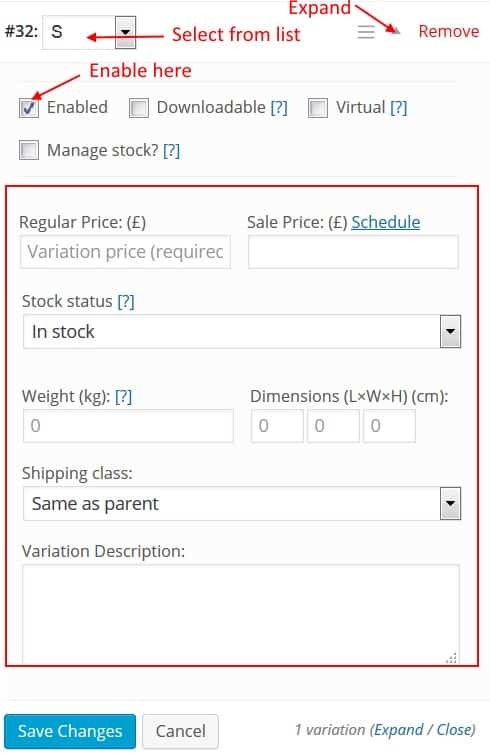
Switch to the Variations tab. Select "Create variations from all attributes" from the dropdown and click Go. WooCommerce generates three variations automatically. Expand each variation to set its price, stock quantity, and upload a variation-specific image if the product image differs by size.
Save the product. Customers now see a size dropdown on the product page. When they select Small, the price and image update to match that variation.
This workflow scales to multiple attributes. A t-shirt with three sizes and four colors generates twelve variations (3 × 4). Each can have unique pricing, inventory, and images.
Up-Sells and Cross-Sells
Up-sells are related products displayed on the product page to encourage customers to purchase a higher-value item. Cross-sells are products shown in the cart to encourage add-on purchases before checkout.
Up-sell example: A customer views a $30 mechanical keyboard. The product page displays a $70 wireless mechanical keyboard as an up-sell — same category, higher price point, better features.
Cross-sell example: A customer adds the $30 keyboard to their cart. The cart page displays a $15 mouse pad and a $10 USB cable as cross-sells — complementary products that pair with the keyboard.
Configure these in the Product Data → Linked Products tab. Search for products to add as up-sells or cross-sells. WooCommerce handles the display automatically based on where the customer is in the purchase flow.
Pre-Launch Checklist
Before you announce your store publicly or run paid traffic to it, verify these items:
Test Checkout in Staging (Managed Hosting) or Carefully on Live (DIY)
If you're on managed hosting with staging environments, create a staging copy of your site now. Test the complete checkout flow: add product to cart, proceed to checkout, enter shipping address, select shipping method, enter test payment credentials, complete order. Verify the order appears in WooCommerce → Orders with correct status. Verify the payment gateway webhook fired successfully (check logs).
If you're on shared hosting without staging, test carefully on your live site using the payment gateway's test mode. Mark the site as "Coming Soon" in WordPress settings or use a maintenance mode plugin so real visitors don't see test data.
Verify Email Notifications Work
WooCommerce sends emails for new orders, completed orders, shipping confirmations, and customer account creation. Process a test order and verify you receive the admin notification email at the address configured in WooCommerce → Settings → Emails. Check spam folders if emails don't arrive — many shared hosting providers have deliverability issues with transactional emails.
If emails aren't arriving reliably, install an SMTP plugin that routes emails through a dedicated service like SendGrid or Mailgun. Managed hosting providers typically configure outbound email correctly by default.
Test Mobile Checkout
More than 60% of ecommerce traffic comes from mobile devices. Open your site on a phone, add a product to cart, complete checkout. Verify all form fields are accessible, buttons are tappable, payment fields render correctly. Mobile checkout failures are silent — customers abandon without reporting the issue.
Create a Backup Before Going Live
On managed hosting, backups run automatically daily. Verify one exists in your dashboard. On shared hosting, install a backup plugin like UpdraftPlus and run a manual backup before launching. Store the backup off-site (Dropbox, Google Drive, or the plugin's cloud storage option).
What Comes After Launch
Your store is live and processing orders. These are the scaling questions you'll face in the first 3–6 months:
When to Add Redis Caching
Redis is an in-memory object cache that dramatically speeds up database-heavy operations like WooCommerce cart and checkout pages. On managed hosting, Redis is available as an add-on. On shared hosting, it's typically unavailable until you upgrade to VPS or managed hosting.
Add Redis when you consistently process 50+ orders per day or 10,000+ visits per month. Below that threshold, server-level page caching handles most performance needs. Above it, database queries become the bottleneck and Redis eliminates that friction.
Kinsta offers Redis as a $100/month add-on. Rocket.net includes it free starting at $30/month. WP Engine includes Redis-backed EverCache on all plans.
When to Upgrade Hosting Tier
Managed hosting plans are tiered by bandwidth or visit limits. When you approach 80% of your plan limit, upgrade before you hit overages. Overages cost $0.50 per 1,000 visits on Kinsta, $2.00 per 1,000 visits on WP Engine. A $50 plan upgrade is cheaper than $200 in overage fees.
Shared hosting doesn't have visit limits but has resource limits. If your host suspends your account for excessive CPU or memory usage, it's time to migrate to managed hosting. That threshold typically hits around 50–100 orders per day on shared plans.
Scaling Resources
For detailed guidance on scaling WooCommerce infrastructure as order volume grows, see our WooCommerce Hosting Guide. For high-volume scenarios (200+ orders per day), see Best Hosting for High-Volume WooCommerce Stores.